
Labour - Job Codes
To Create a New Job Code
-
Click on the Create button.
-
In the Create Job Code window:
-
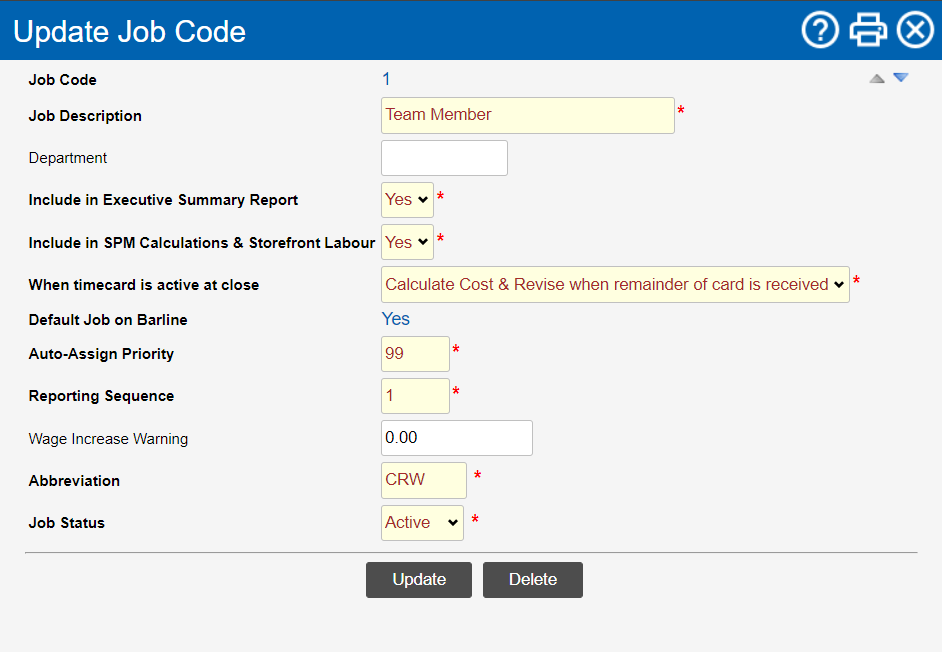
Enter a unique code for the job in Job Code.
-
Enter the role or description of the job in Job Description (for example, Manager, Cook, etc.).
-
Enter the Department, if required.
-
Select Yes if you want to include time cards for the job in the calculation of Wage % in the Executive Summary, or No to exclude it, from the Include in Executive Summary Report drop-down list.
You'd normally select Yes if you want the wages for the job included in the total wages for the store.
-
Select Yes if you want to include hours clocked at the job in the sales per man hour calculation and the wages earned at the job included in the calculation of labour cost, labour %, wage cost and wage %, in reports other than the Executive Summary report, or No to exclude it, from the Include in SPM Calculations & Storefront Labour drop-down list.
You'd normally select Yes if the job directly relates to production or sales.
-
Select how you want to treat time cards that hadn't clocked out when the end of day Completion of end of day tasks on the POS which results in EOD markers sent to Clearview. was performed, from the When time card is active at close drop-down list:
-
Do not calculate cost until remainder of card is received will not calculate the wages for the time card until the time card is clocked out.
-
Calculate Cost and Revise when remainder of card is received will calculate the wages for the time card assuming that the end of day Completion of end of day tasks on the POS which results in EOD markers sent to Clearview. is the clock out time, and will update the wages once the completed time card is received.
-
Treat as separate cards will calculate the wages for the time card assuming that the end of day Completion of end of day tasks on the POS which results in EOD markers sent to Clearview. is the clock out time, and the extra hours up to the time the employee clocks out will be treated as a separate time card.
-
-
Select Yes from the Default Job on Bar Line drop-down list if you want to schedule employees for the job through the auto-generate feature in Labour > Schedule > Bar Line Scheduling, else select No.
-
Only one job code can be set as the default for Bar Line Scheduling. If another job code is already set as the default, setting the Bar Line Scheduling for this job code to Yes will automatically switch the previous one to No.
-
Setting this control to No will require a manual creation of the schedule for the job or the job has to be set as a recurring shift
-
-
Enter a number in Auto-Assign Priority. (This number determines the order in which jobs are prioritized when you auto-generate or auto-assign employees to shifts in Labour > Schedule > Bar Line Scheduling and Labour > Schedule > Clearview Schedule. The smaller the number the higher the priority.)
-
Enter a number in Reporting Sequence (this number determines the order in which the jobs will appear in the drop-down list).
-
Enter the maximum increase in wages that you expect to apply to the job in Wage Increase Warning. If there's an attempt to increase wages above the maximum set, CLEARVIEW will indicate the same with a warning.
-
Enter the Abbreviation you'd like to use for the job.
-
Select Active from the Job Status drop-down list if you want to be able to assign the job to employees, or Inactive if you don't want the job to be assigned to employees at present.
-
Click on the Create button.
-